Preparation
PotatoOAuth2.0 APIs use the OAuth2.0 protocol for authentication and authorization.
Before the authorization login of Potato OAuth2.0, developer should register a account in the Potato developer center, and have an approved web application or mobile application to obtain client_id and client_secret, after that the process can be started.
1. At present, Potato login on mobile apps only provides a native login mode, which requires users to install Potato client to work with it.
                                2. For Android apps, it is recommended to always display the Potato login button. When the Potato client is not installed on the user's phone, please guide the user to download and install the Potato client.
                                3. For iOS apps, it is recommended to always display the Potato login button. When the Potato client is not installed on the user's phone, please guide the user to download and install the Potato client.
Basic Steps
Potato OAuth2.0 APIs allows Potato user use Potato identity to secure access to third-party websites or applications, After the Potato user is authorized login to the third-party application that has access to the OAuth2.0, the third party can obtain the user's interface call credentials (access_token). The access_token can be used to make the API open platform authorization relationship interface call, which can realize the basic open information of the Potato user and help the user to implement the basic open function.
Potato OAuth2.0 APIs is currently in authorization_token mode. The overall process of this mode is as follows:
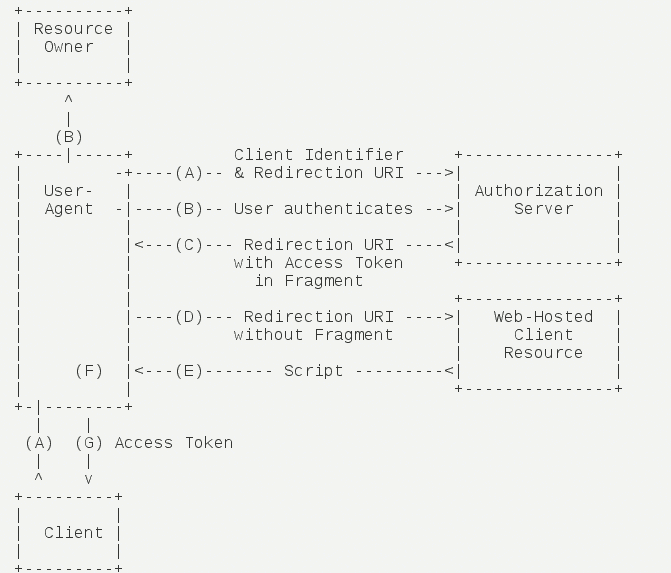
1. The third party initiates the Potato authorization login request. After Potato users authorize the third party application, Potato will pull up the application or redirect to the third party website with the authorization access_token.
                                2. Through access_token and client_secret to obtain basic data resources or help users to realize basic operations.
Domain name
Recommended domain name for mainland China: https://oauth.xcxrz.com
Domain names are recommended for regions outside mainland China: https://oauth.pname.im
Download SDK
Server-site
When the third party uses the webapp, please guide users requesting the following URL:
{{domain}}/oauth2/authorize?response_type=token&client_id=CLIENT_ID&redirect_uri=REDIRECT_URI&state=STATE
| Parameters | Required | Type | Description |
|---|---|---|---|
| response_type | yes | string | Here must be "token" |
| client_id | yes | string | The client ID for your application. |
| redirect_uri | yes | string | Determines where the API server redirects the user after the user completes the authorization flow. |
| state | no | string | Specifies any string value that your application uses to maintain state between your authorization request and the authorization server's response.ServerResponse=Server Response |
Server Response
If the user approves the access request, then the response contains an access token.
redirect_uri?access_token=ACCESS_TOKEN&expired=EXPIRED&state=STATE
If the user does not approve the request, the response contains nothing.
redirect_uri?state=STATE
Mobile Apps
Android Mobile App
1 Put the downloaded jar package in the appropriate libs directory. (or add the jar package directly to the project by importing the external package)
It must manually import the jar package by copying it to the libs directory.
2.Add jar use permissions (skip this step if the application has been added), Add under the root node of the android manifest.xml file:
<uses-permission android:name="android.permission.INTERNET"/>3 Configure AndroidManifest.xml file. Add under the node of application.
<activity
    android:name="im.potato.potato_sdk.LoginActivity"
    android:configChanges="orientation|screenSize|keyboardHidden"/>
4 Configure AndroidManifest.xml file. Add under the node of application
This step is not required. Please refer to step 5 for use
<meta-data
android:name = "PotatoClientID"
android:value = "YourClientId"/>
5 Configure in Application Clients:
Once the ClientID is configured in AndroidManifest.xml, the AndroidManifest.xml configuration will be used regardless of the calling method.
1.Login.launchClientLogin(MainActivity)
2.Login.launchClientLogin(MainActivity.this,"YourClientId");
6 Rewrite onActivityResult in Activity.
    @Override
    protected void onActivityResult(int requestCode, int resultCode, Intent data) {
        super.onActivityResult(requestCode, resultCode, data);

        if (requestCode == IdentifierUtils.sClientLoginRequestCode) {
            if (resultCode == IdentifierUtils.sNetError) { // error network
                String error = data.getStringExtra("error");
                Log.d("error", error);

            } else if (resultCode == RESULT_OK) { //token
                if (data != null) {
                    Bundle bundle = data.getExtras();
                    AuthToken authToken = (AuthToken) bundle.getSerializable("getToken");

                    Log.d("TAG", "token:" + authToken.toString());
                    if (authToken.success) {
                        Log.d("TAG","success");
                    } else {
                        Log.d("TAG","error:" + authToken.message);
                    }

                }
            } else if (resultCode == IdentifierUtils.sNoPotatoClientID) { // configure client_id
                Log.d("TAG", data.getStringExtra("error"));

            } else if (resultCode == IdentifierUtils.sNoInstallPotato) { // install potato
                Log.d("TAG", data.getStringExtra("error"));
            }else if(resultCode == IdentifierUtils.sOAuthFail) {
                Log.d("TAG", data.getStringExtra("error"));
            }
        }
    }
iOS Mobile App
This document corresponds to SDK version 1.5. It only supports application authorization, but does not support web authorization for the time being.
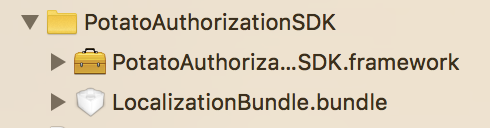
1 Go to the official website to download the SDK, add all the files in the PotatoAuthorizationSDK folder to the project, the files in the folder need to be put together, as shown below:

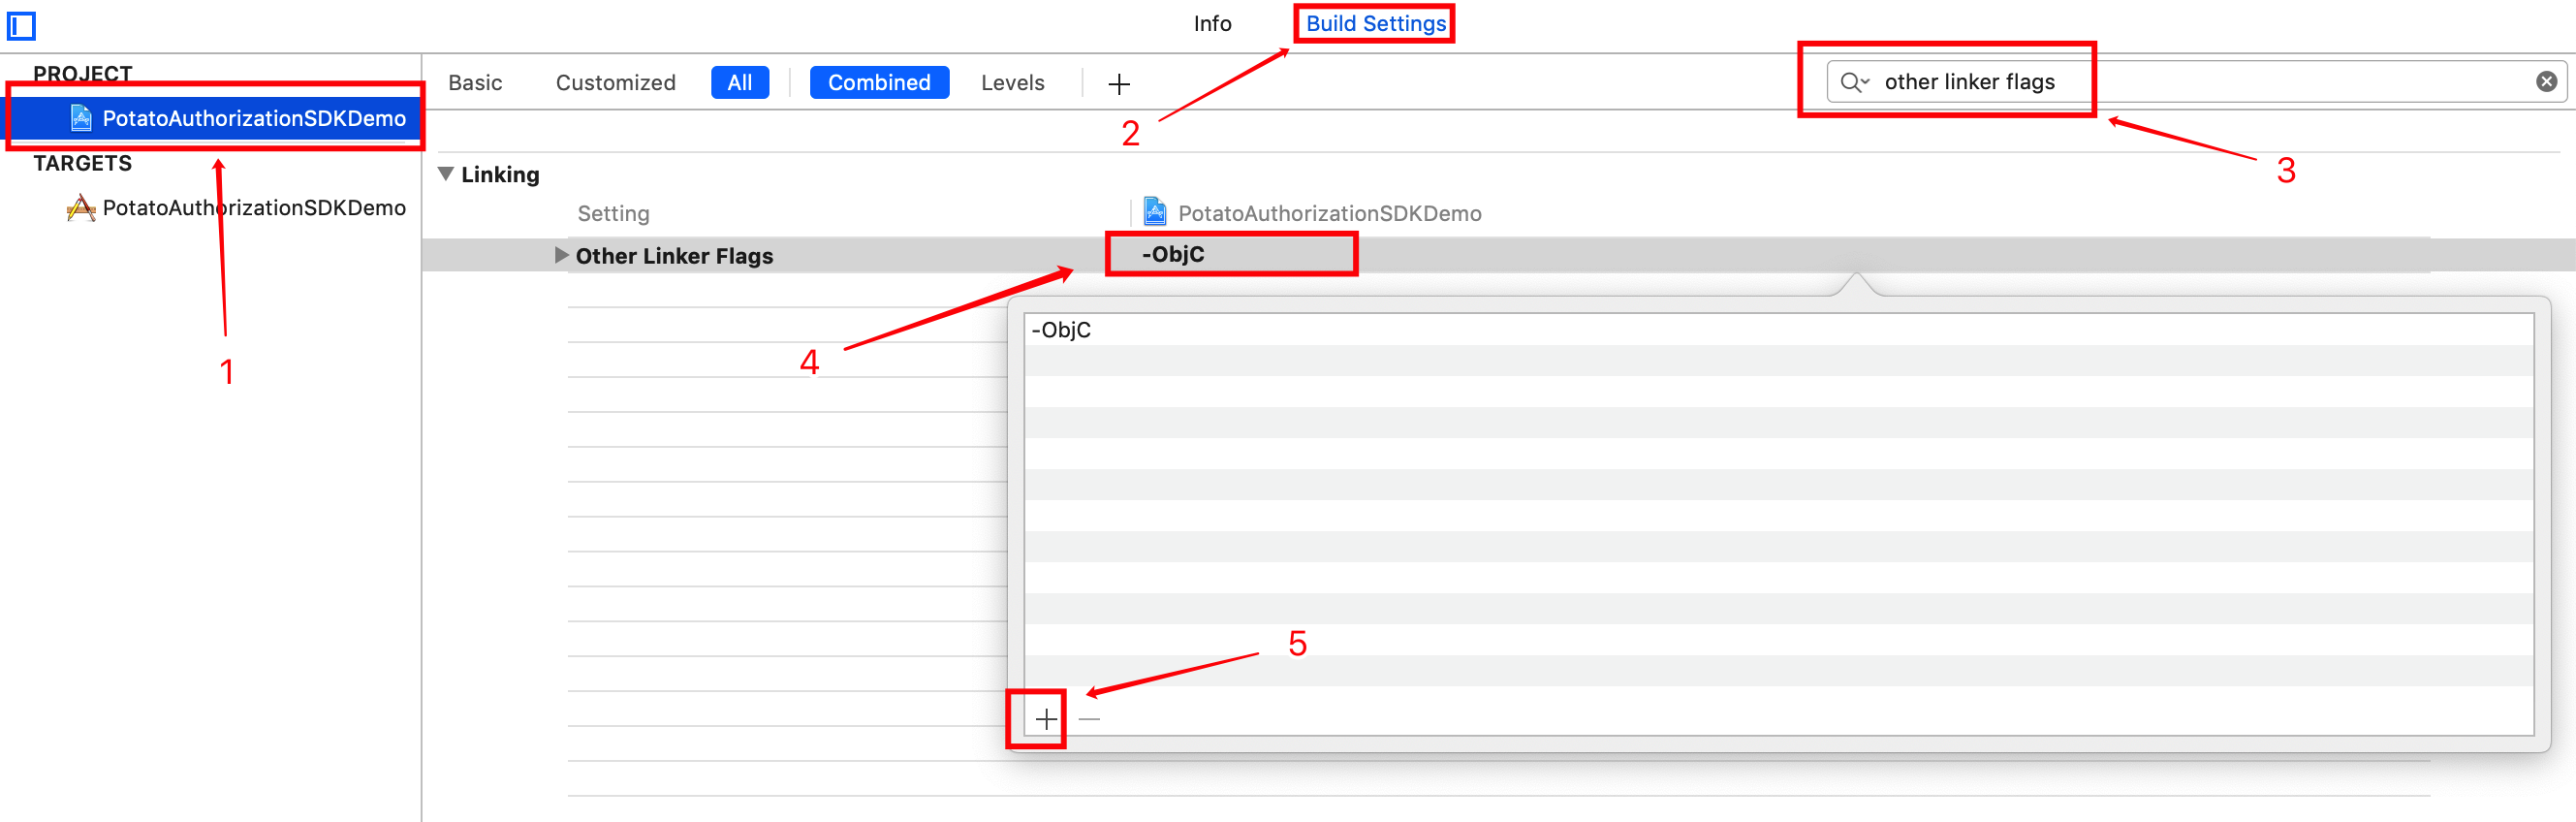
2 Find the current SDK where the project corresponds to the Other linker flags option to add ‘-ObjC’, as shown below:
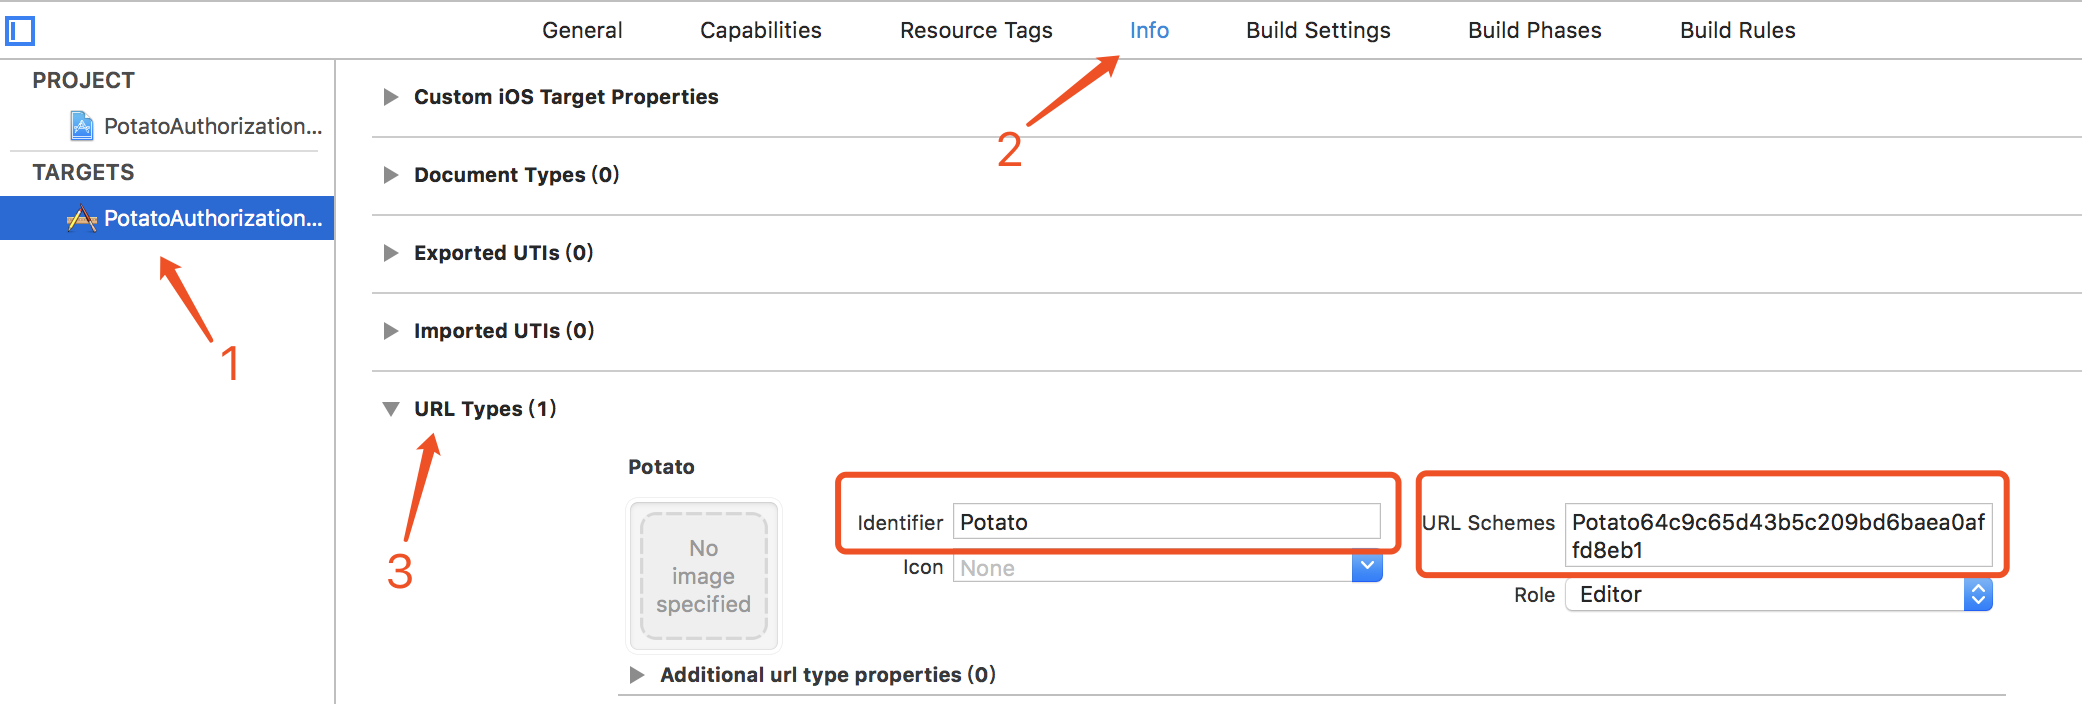
3 Configure urlscheme in your own project, the identifier is Potato, and the scheme is Potato+ClientID as shown below:
4 Add the potato program to the whitelist as shown below:

5 Import “PotatoGuards.h” into your project as shown below:

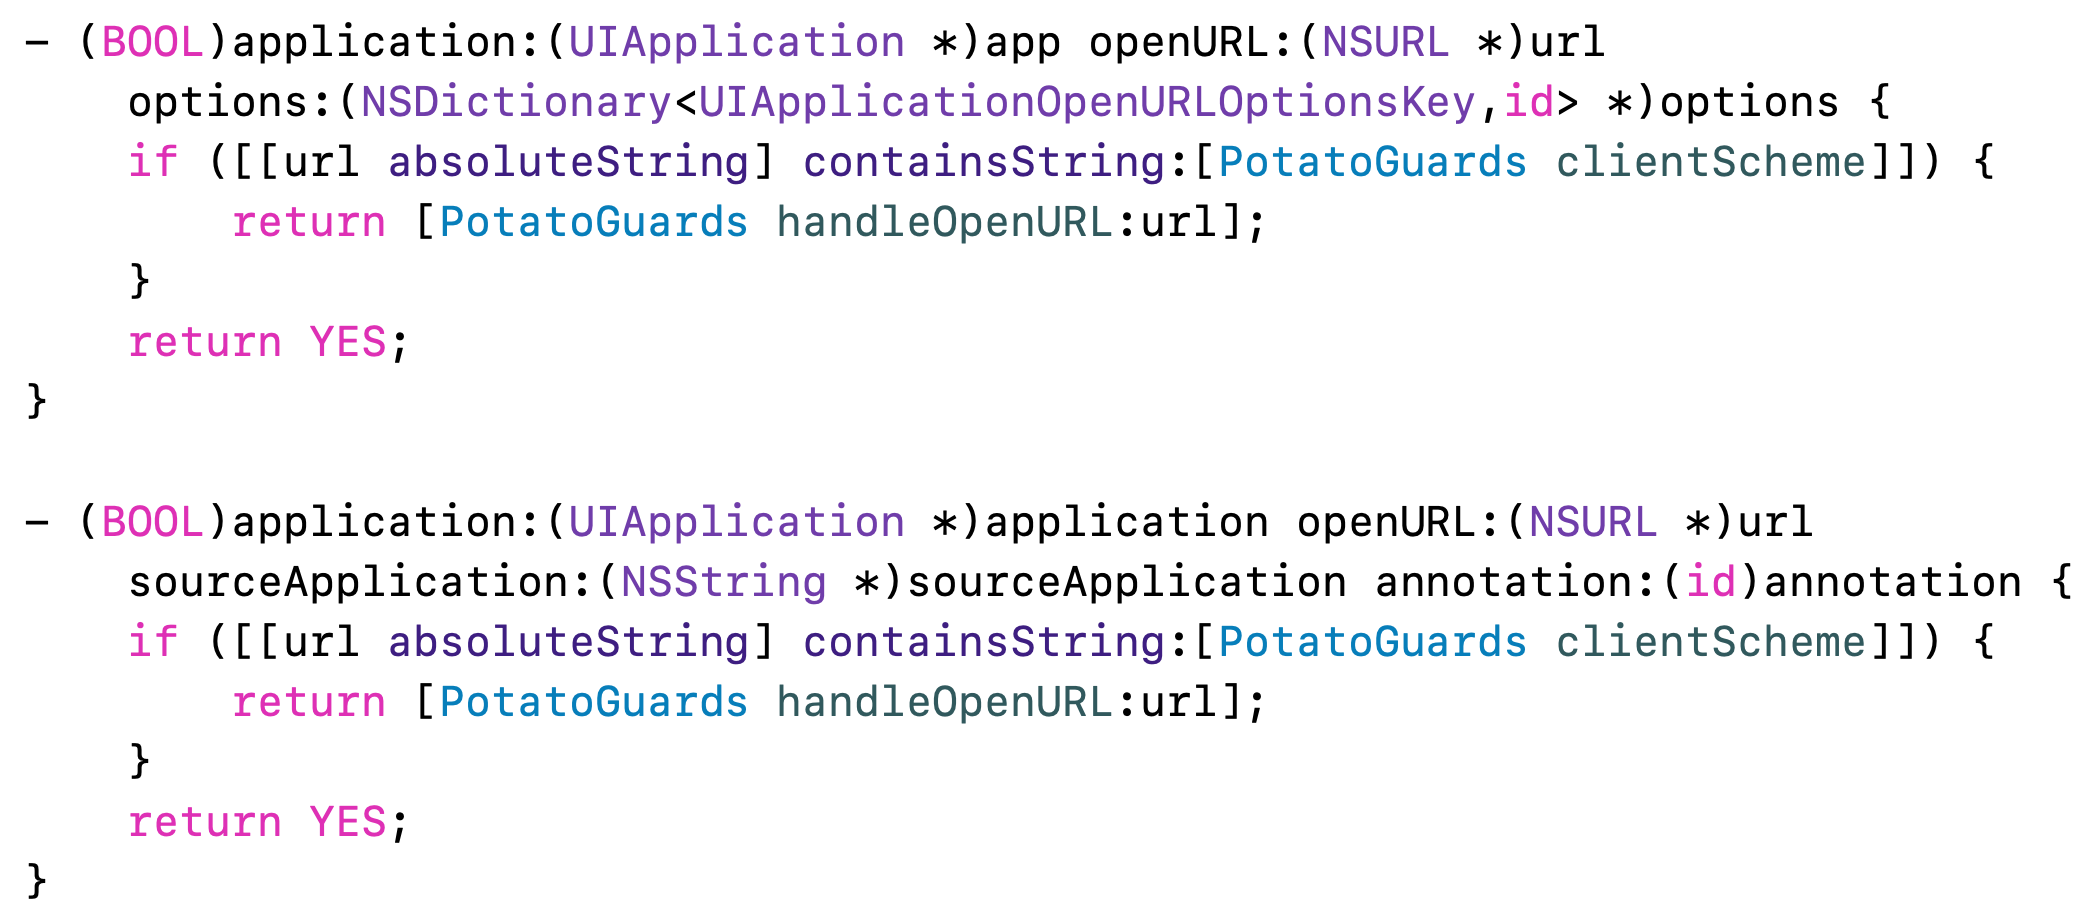
6 Rewrite the following two methods in AppDelegate
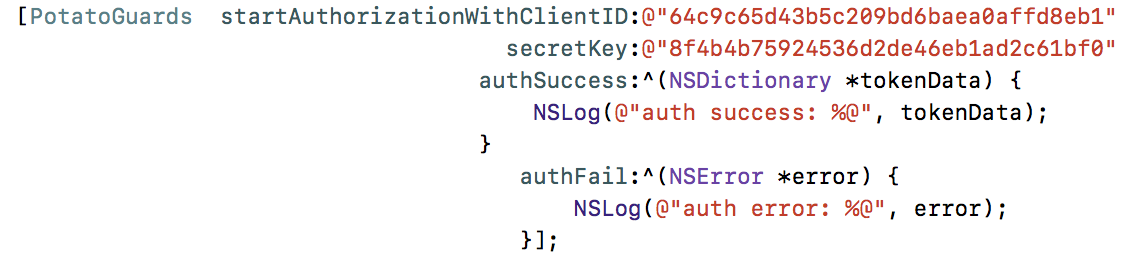
7 Using class method direct invocation, success will get token and valid time, failure will return error code and error reason
UserInfo API
{{domain}}/oauth2/api/userinfo?access_token=ACCESS_TOKEN&client_secret=CLIENT_SECRET
POST
application/x-www-form-urlencoded
| Parameters | Required | Type | Description |
|---|---|---|---|
| access_token | yes | string | access token |
| client_secret | yes | string | client secret |
Server Response
success example:JSON
                              {
                            "open_id":"fHIE0JbejMjql1SaDOp-E-PZ-inFbC1uiAnq7YDJV0k=",//user's unique id
                            "union_id":"Triy0Fj1gnA480MVlqKakmtduDQdMUbdijXn0QJHNrM=",//developer unique id
                            "username":"jack",//user's username
                            "phone":"19912345678",//user's phone number
                            "country_code":"86",//the user country code
                            "photo_base64":"9j/2wCEAAgGBgcGBQgHBw.....",//user's avatars base64 encoded data
                        }
error example:JSON
{
    "success" : false, // error
    "code" : 4116, //response code
    "message" : "missing access_token", //response message
}
Errors (http response code always '200')Errorsresponse2
response json result. if not successful, code is:
| Error Codes | Message | Description |
|---|---|---|
| 4116 | missing access_token | require request parameter 'access_token' |
| 4117 | missing client_secret | require request parameter 'client_secret' |
| 4213 | invalid access_token | your access_token is wrong |
| 4214 | invalid client_secret | your client_secret is wrong |
| 5401 | the token has expired | your token has expired |
| 5900 | $e | unknown exception |